Flutter Under the Hood
Hello! My name is Mikhail Zotyev, I am a Tech Lead Flutter team at Surf. I have been with Flutter for almost 2 years and during this time I managed to appreciate and feel its various qualities. It is friendly — you can easily and quickly get used to Flutter if you have experience in any other direction. Personally I came from game development. Flutter is flexible — it is a powerful framework that will allow you to solve various problems, including those of high complexity. And while it is flexible, it is not complicated, but on the contrary, very simple: with the help of a dozen basic widgets, you can assemble quite decent user interfaces. And the most interesting thing is that most likely you will be able to use it, at first without even thinking about the question: “How does it work at all?”
Widget
The Flutter development team has been repeatedly telling us that Flutter is all about widgets. Let us see if this is true. First, let us take a look at the Widget class.
The first thing we see in the documentation for this class is:
Describes the configuration for an [Element].
Turns out, the widget itself is simply a description of a certain Element.Widgets are the central class hierarchy in the Flutter framework.
A widget is an immutable description of part of a user interface. Widgets can be inflated into elements, which manage the underlying render tree.
To sum up, Flutter is all about widgets is the bare minimum you need to know to be able to use Flutter. At the same time, it is surrounded by a number of additional mechanisms that serve the framework.
We also learned that:
- a widget is an immutable description of part of a user interface
- a widget is associated with a certain extended representation called an element
- an element controls some entity in the render tree.
You might have noticed something odd. Immutability and the user interface do not fit together very well. I would even say, they are incompatible. Keep that in mind, we will get back to it later. For now, let us get on with the widget documentation.
Widgets themselves have no mutable state (all their fields must be final). If you wish to associate mutable state with a widget, consider using a [StatefulWidget], which creates a [State] object (via [StatefulWidget.createState]) whenever it is inflated into an element and incorporated into the tree.
This paragraph supplements the first point. That is, if we need a mutable configuration, we use a certain entity called State which describes the current state of this widget. The state, however, is associated not with the widget itself but with its element representation.
A given widget can be included in the tree zero or more times. In particular a given widget can be placed in the tree multiple times. Each time a widget is placed in the tree, it is inflated into an [Element], which means a widget that is incorporated into the tree multiple times will be inflated multiple times.
Let us summarize what we know about widgets so far:
- a widget is a central class hierarchy.
- a widget describes a configuration.
- a widget is an immutable description of part of a user interface.
- a widget is associated with an element that controls rendering.
- mutable state of a widget can be described by an entity that is associated with an element representing that widget and not with the widget itself.
Element
What are those elements that handle everything? Let us see what we can find in the documentation for the Element class.
An instantiation of a [Widget] at a particular location in the tree.
Widgets describe how to configure a subtree but the same widget can be used to configure multiple subtrees simultaneously because widgets are immutable. An [Element] represents the use of a widget to configure a specific location in the tree. Over time, the widget associated with a given element can change, for example, if the parent widget rebuilds and creates a new widget for this location.
Widgets describe how to configure a part of a user interface. But, as we already know, one and the same widget can be included in the tree multiple times at several locations. Each of these locations is represented by a corresponding element. A widget associated with an element may change over time. This means that elements are more resilient and continue to be used, needing only to update their associations.
This is a fairly rational solution. Widgets are an immutable configuration that simply describes a particular part of the interface, thus, they have to be pretty lightweight. Elements responsible for handling objects are significantly heavier and do not get rebuilt unless it is necessary.
In order to understand how it works, let us take a look at the element’s lifecycle:
- An element is created by calling Widget.createElement on the widget that will be used as the element’s initial configuration.
- The mount method adds the newly created element to the tree at a given slot in a given parent. Calling this method also allows you to inflate any child widgets and attach elements to the render tree.
- At this point, the widget is considered active and might appear on screen.
- If the widget associated with an element is changed (e.g. its parent element is rebuilt), there are several possible scenarios. If the new widget has the same runtimeType and key as the old widget, the element will be associated with the new widget. Alternatively, the current element is removed from the tree and a new element is created to be associated with the new widget.
- In case the parent decides to remove a child or an intermediate ancestor, it will lead to removing that element’s render object from the render tree and adding it to the list of inactive elements, thus deactivating that element by calling deactivateChild.
- Once an element is considered inactive, it will not appear on the screen. An element can remain in the inactive state only until the end of the current frame. If it remains inactive at this point, the framework considers it defunct and this element will be unmounted.
- If the element gets reincorporated into the tree (e.g., because it or one of its ancestors has a global key that is being reused), it will be removed from the owner’s list of inactive elements. The framework will call activate on the element, and reattach the element’s render object to the render tree. This means that the element might appear on the screen again.
As we can see from the class declaration, the element implements the BuildContext interface. BuildContext is an entity that handles the location of a widget in the widget tree, as stated in its documentation. It is almost identical to the element description. This interface is used to avoid direct manipulation of elements but at the same time give access to the necessary context methods. For example, the findRenderObject method allows you to locate this element’s render object in the tree.
RenderObject
The last class we will look into is RenderObject. As the name implies, it is a render object. RenderObject has a parent as well as a slot where the parent can store child-specific data, for example, this object’s position. This object is responsible for implementing the basic layout and paint protocols.
RenderObject does not define a child model. It can consist of zero, one, or more children. On top of that, it does not define a coordinate system. You are free to choose from Cartesian coordinates, polar coordinates, or whichever system suits your needs. There are also no restrictions on layout protocols. You can decide either to adjust the width and height of the layout, or constrain the size of the layout, or set the size and position of the child. If needed, the children can use their parent’s data.
Putting it all together
Let us summarize what we have learned so far to see how everything works together.
As we have established before, a widget is an immutable description whereas the user interface is far from being static. This discrepancy is removed by dividing the objects into three levels as well as dividing responsibilities:
- The widget tree declares configurations and stores properties.
- The element tree handles lifecycle and arranges widgets into a hierarchy as well as associates render objects with widgets.
- The render tree manages painting, sizes, and constraints.
Let us see how these trees function on a simple example:
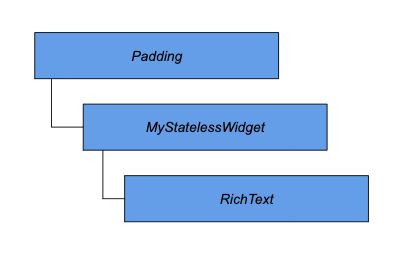
Here we have the StatelessWidget containing some text, wrapped in the Padding widget.
Let us put ourselves in Flutter’s shoes for a moment. Say, we are given this particular widget tree.
Flutter: Hey, Padding, I need your element.
Padding: Sure thing, here’s SingleChildRenderObjectElement.
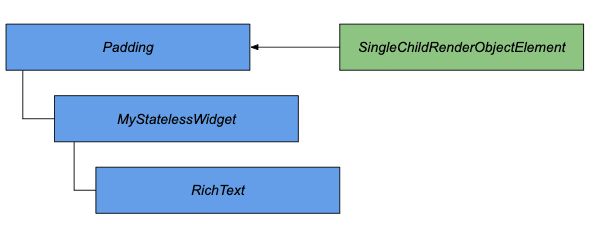
Flutter: That’s where you’ll be staying, element, make yourself at home.
SingleChildRenderObjectElement: It’s all good, guys, but I need RenderObject.
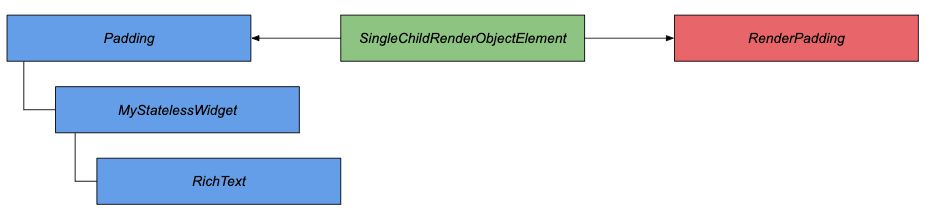
Flutter: Padding, how am I supposed to render you?
Padding: There you go, one RenderPadding, as requested.
SingleChildRenderObjectElement: Great. I’m on it!
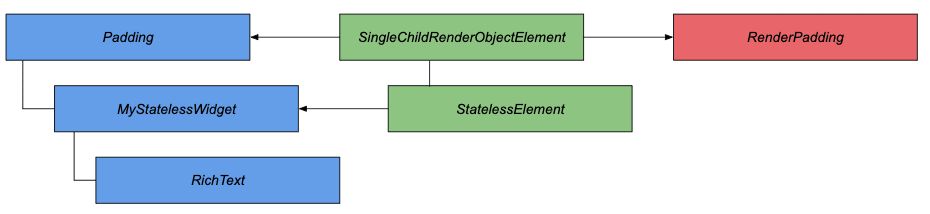
Flutter: Who’s next? StatelessWidget, now you give me an element.
StatelessWidget: Here’s your StatelessElement.
Flutter: StatelessElement, you’ll be subordinate to SingleChildRenderObjectElement. This is your desk, get to work.
StatelessElement: Ok.
Flutter: RichText, may I see your element please?
RichText hands their MultiChildRenderObjectElement over.
Flutter: MultiChildRenderObjectElement, here is your place, get to work.
MultiChildRenderObjectElement: I can’t work without a render.
Flutter: RichText, we need a render object.
RichText: Here’s RenderParagraph.
Flutter: RenderParagraph, you’ll be receiving instructions from RenderPadding. MultiChildRenderObjectElement will be supervising your work.
MultiChildRenderObjectElement: I’m all set now and ready to start.
You’re probably wondering why there isn’t a render object for StatelessWidget since we have stated that elements associate configurations with rendering? Let us take a closer look at the basic implementation of the mount method.
void mount(Element parent, dynamic newSlot) {
    assert(_debugLifecycleState == _ElementLifecycle.initial);
    assert(widget != null);
    assert(_parent == null);
    assert(parent == null || parent._debugLifecycleState == _ElementLifecycle.active);
    assert(slot == null);
    assert(depth == null);
    assert(!_active);
    _parent = parent;
    _slot = newSlot;
    _depth = _parent != null ? _parent.depth + 1 : 1;
    _active = true;
    if (parent != null)
        _owner = parent.owner;
    if (widget.key is GlobalKey) {
        final GlobalKey key = widget.key;
        key._register(this);
    }
    _updateInheritance();
    assert(() {
        _debugLifecycleState = _ElementLifecycle.active;
        return true;
    }());
}
We will not find a render object being created here. Instead, the element implements BuildContext which contains the findRenderObject method. This method leads us to the next getter:
RenderObject get renderObject {
    RenderObject result;
    void visit(Element element) {
        assert(result == null);
        if (element is RenderObjectElement)
            result = element.renderObject;
        else
            element.visitChildren(visit);
    }
    visit(this);
    return result;
}
In the base case, elements may not create a render object, it is something that RenderObjectElement and its descendants do. However, the element must have a child containing a render object at some level of nesting.
It would appear too complicated, having to deal with three trees and different sets of responsibilities. But this is precisely what Flutter’s performance is built upon. Widgets are immutable configurations, therefore they are often being rebuilt. At the same time, they are pretty lightweight, so it does not affect performance. As for heavy elements, Flutter tries reusing them as much as possible.
Consider this example.
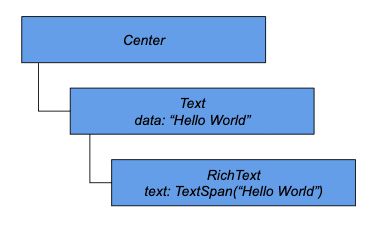
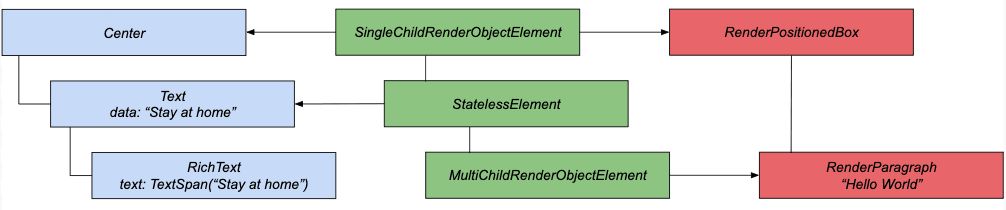
The text is displayed in the center of the screen. The code will look like this:
body: Center(
    child: Text(“Hello world!”)
),
The widget tree will have the following structure:
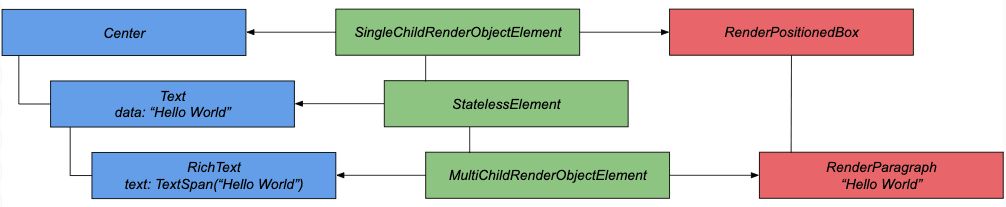
Once Flutter has built all three trees, this is what we will get:
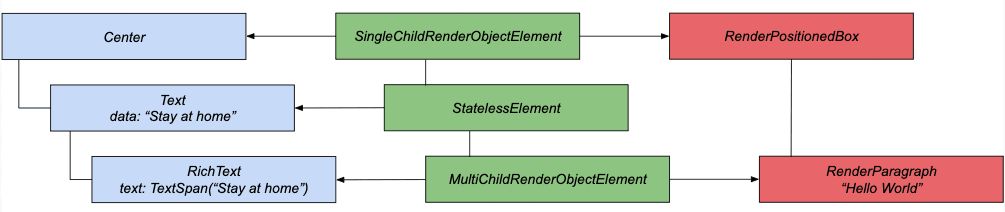
What happens if we change the text that we want to display?
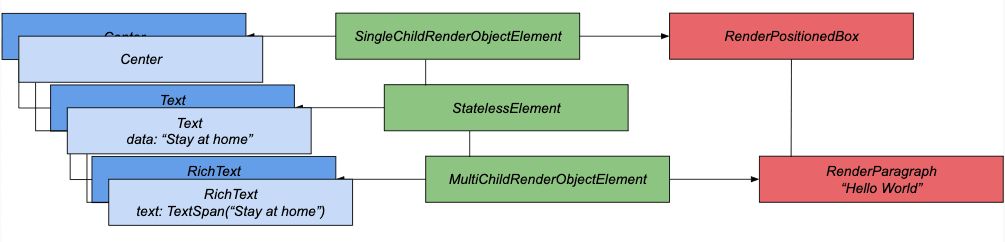
Now we have a new widget tree. We mentioned that Flutter tries to make the most of the existing elements. Let us take a look at another method in the Widget class with a telling name canUpdate.
static bool canUpdate(Widget oldWidget, Widget newWidget) {
    return oldWidget.runtimeType == newWidget.runtimeType && oldWidget.key == newWidget.key;
}
We check the type and key of the previous widget and compare them with those of the new widget. If they are identical, there is no need to change the element.
Before the update, Center was the first element, and it remains there after the update. None of them have keys, it is a complete match. We can update the element’s association with the new widget.
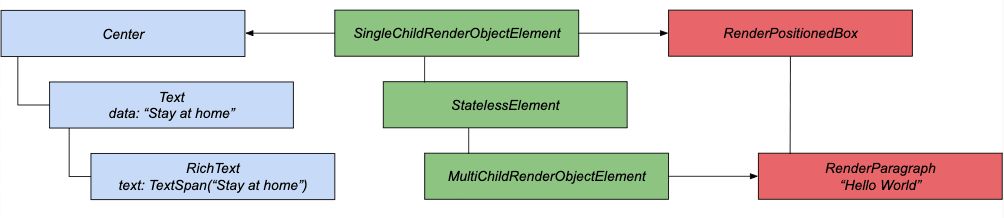
Apart from having type and key, a widget is a description and a configuration. This means that parameter values needed for displaying might have changed. That is why the element must initiate updates of the render object after updating the association with the widget. Nothing changes for Center here. Let us continue examining the widgets.
Again, type and key suggest that there is no point in rebuilding the element. The text is a descendant of StatelessWidget and it does not have a direct display object.
Let us move on to RichText. As in the previous case, the widget has not changed its type, the keys are identical. The element updates the association with the new widget.
Now it is time to update properties. This will result in RenderParagraph displaying the new text value.
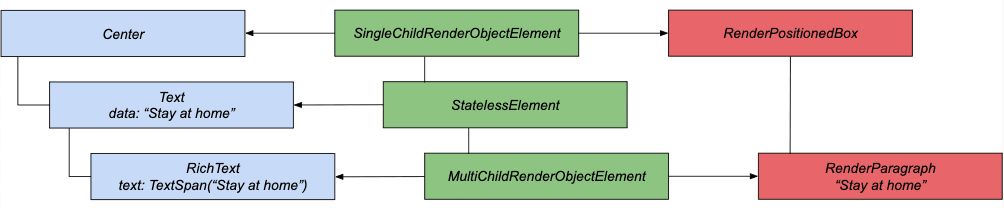
We will see the expected result after the next rendering frame.
That is how Flutter achieves such high performance.
This example illustrates a case where the widget structure remains unchanged. What happens if it does change? Flutter will try to make the most of already existing objects, as we know from the lifecycle description. At the same time, Flutter will create new elements for all new widgets whereas old ones that are no longer needed will be removed at the end of the frame.
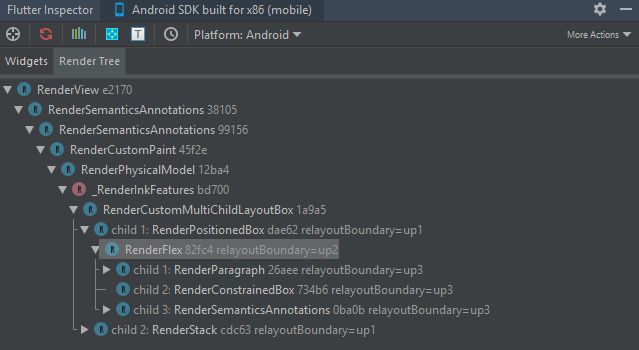
To prove this point, let us consider this example in which we will be using the Flutter Inspector tool in Android Studio.
@override
Widget build(BuildContext context) {
    return Scaffold(
        body: Center(
            child: _isFirst ? first() : second(),
        ),
        floatingActionButton: FloatingActionButton(
            child: Text("Switch"),
            onPressed: () {
                setState(() {
                    _isFirst = !_isFirst;
                });
            },
        ),
    );
}

Widget first() => Row(
    mainAxisAlignment: MainAxisAlignment.center,
    children: <Widget>[
        Text(
            "test",
            style: TextStyle(fontSize: 25),
        ),
        SizedBox(
            width: 5,
        ),
        Icon(
            Icons.error,
        ),
    ],
);

Widget second() => Row(
    mainAxisAlignment: MainAxisAlignment.center,
    children: <Widget>[
        Text(
            "one more test",
            style: TextStyle(fontSize: 25),
        ),
        Padding(
            padding: EdgeInsets.only(left: 5),
        ),
        Icon(
            Icons.error,
        ),
    ],
);
If we press the button, one of the widgets will change. Let us see what the inspector shows.
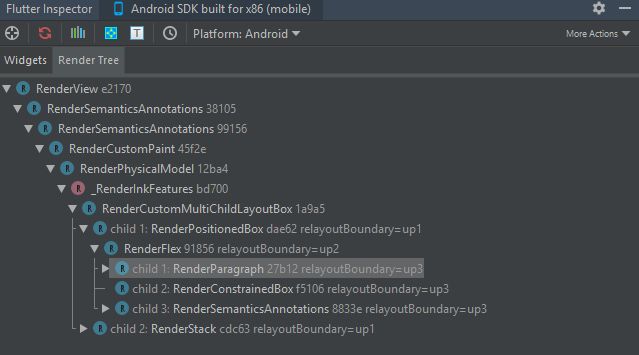
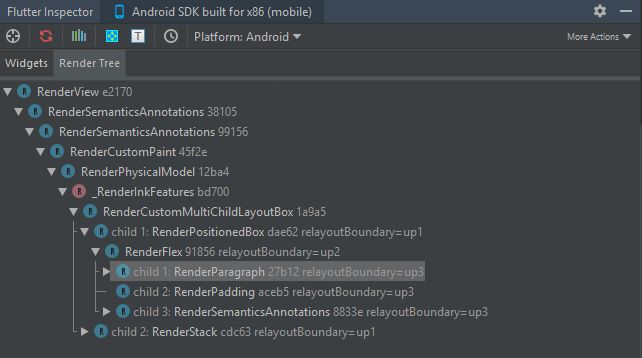
As we can see, Flutter only rebuilt RenderPadding and reused the rest.Here is another example, in which we will change the levels of nesting, thus changing the structure drastically.
Widget second() => Container(child: first(),);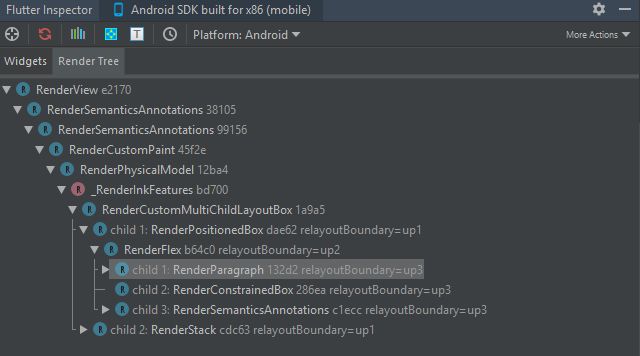
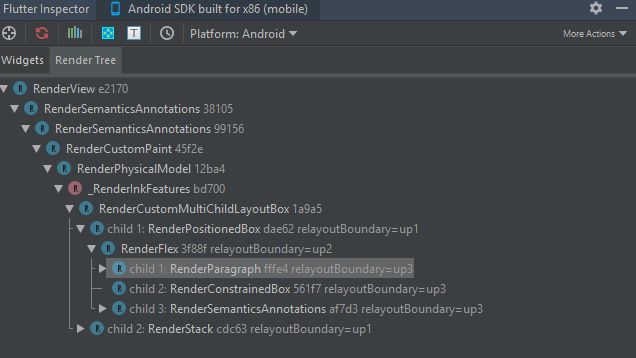
Although the tree appears to be the same, the elements and render objects have been rebuilt. This happened because Flutter compares by level. It does not matter that the tree remained mostly unchanged. This part was filtered out when Container and Row were being compared. However, this can be avoided If we use GlobalKey. Let us add this key to Row.
var _key = GlobalKey(debugLabel: "testLabel");

Widget first() => Row(
    key: _key,
    …
);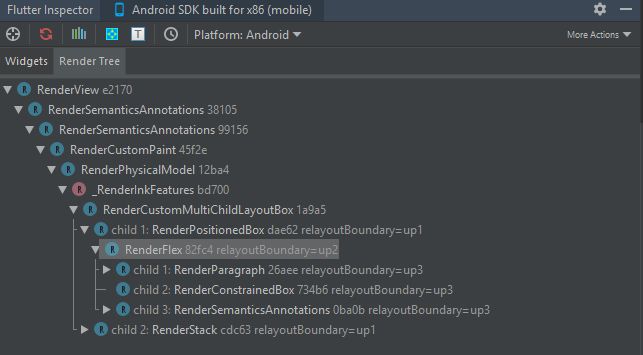
When we told Flutter that this part can be reused, the framework was happy to oblige.
In conclusion
In this article, we began to unveil the secrets of Flutter’s magic and found out that it is not only about widgets.
Flutter is a well-thought-out, coherent mechanism with its unique hierarchy and sets of responsibilities that allows you to build both beautiful and performant apps. I have only analyzed a small portion of Flutter and will continue exploring various aspects of its inner workings in future articles.
I hope that this article helped you learn more about how Flutter works and inspired you to seek elegant and performant solutions during development.
References
Flutter Code «How Flutter renders Widgets» Andrew Fitz Gibbon, Matt Sullivan